
You’ve been in the situation, we’re sure. Imagine the situation. You are on your way to a meeting with the boss, in line for a big promotions, but then it happens; you can’t get your tie to hold. While fixing that, you also notice a massive crease in your shirt sleeve, not to mention the scuff on your dress shoes. What a mess. You just don’t have the 30 minutes that it takes to shine them up. There it goes, the chance for the big promotion, right? Well, not necessarily. At least it won’t be because of your outfit. Most of the essential skills that gents need in order to look their best are actually quite quick and easy to pull off. In this article you’ll find the 10 most fundamental style skills that every gent should be able to master. If you manage to do this, then these tricks will help you put out “style-fires” before they even have the chance to get a foothold.
Technique number 1: The Half-Windsor Tie Knot
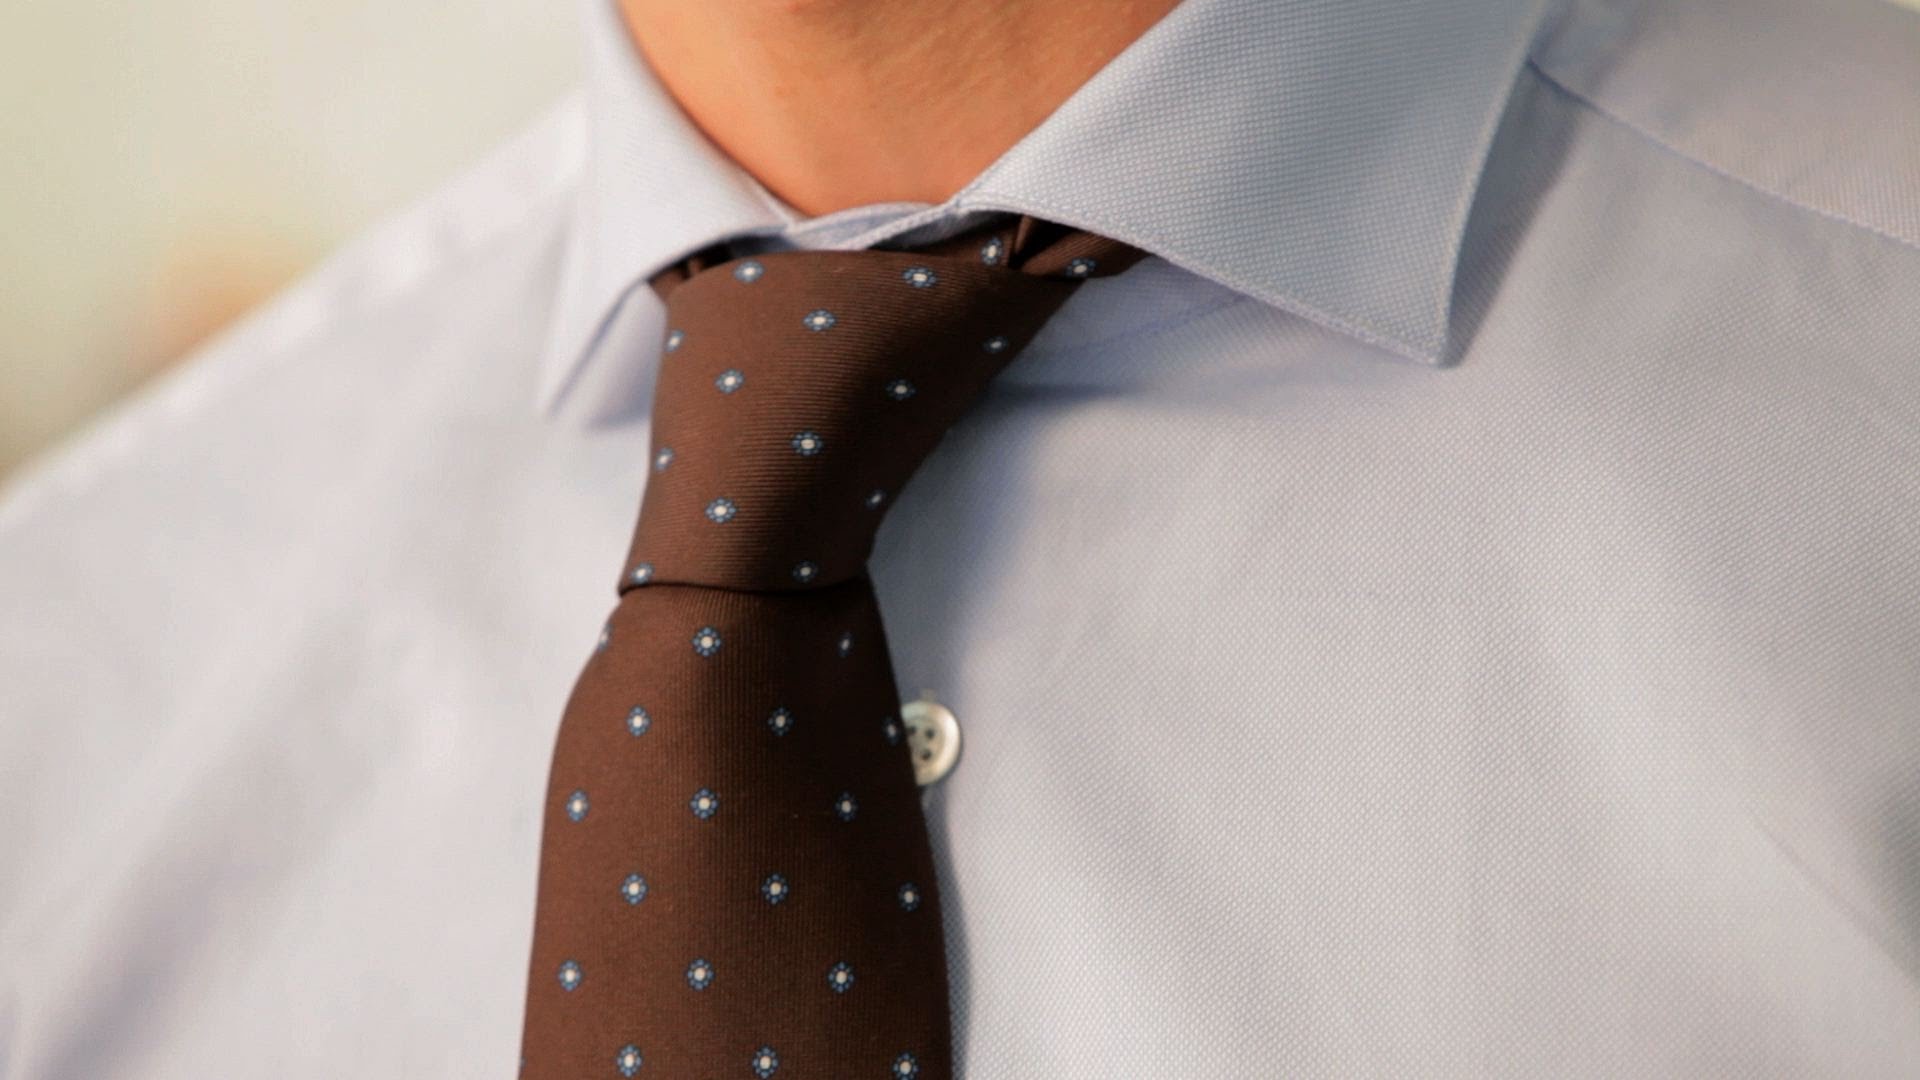
Half-what, you may find asking yourself? The Half-Windsor is just one of so many tie knots you could learn to master. The Half-Windsor is a medium-sized tie know that forms a symmetrical triangle on your neck. That however doesn’t make the necktie look too flashy, but still business appropriate. Since the Half-Windsor is smaller than a full Windsor knot, it’s compatible with a button-down-, medium spread- or a pointed collar on a dress shirt. A Half-Windsor is relatively quick and easy to tie. Just begin with the wide end that is longer than the narrow end. Take the wide end and cross it over the narrow end, going under and up through the neck opening, thereafter slip it through the loop you just formed. Hold on to the narrow end and push the knot up towards your neck. Does that sound confusing? Try it out for yourself, practice it, and very soon this will become an automatic practice as easy as tying your shoes.
Technique Number 2: The perfect necktie dimple
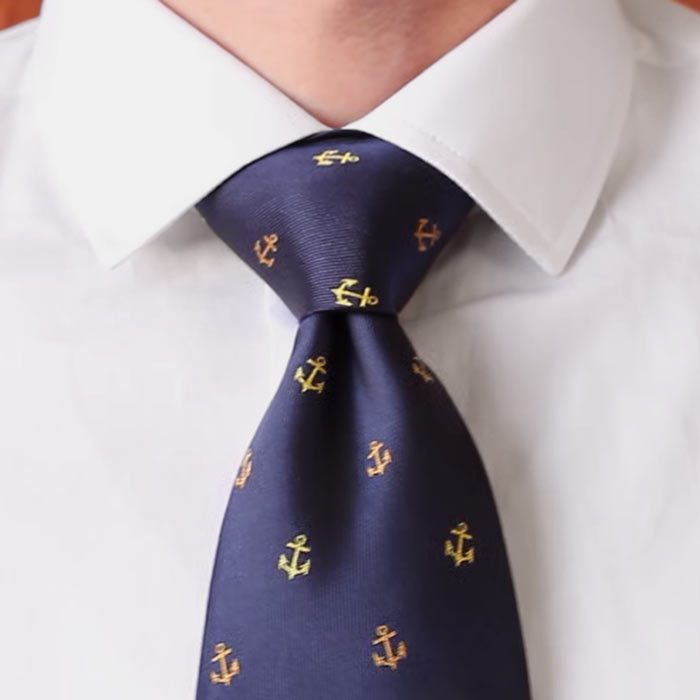
Not every gent can put up a smile and show off the attractive dimples of theirs. For a dimple-less face make use of necktie dimples. These wonders really help with adding more character to your formal and casual outfits by showing off to the world what attention to detail you master.
Start off by tying whatever tie knot you favour. Thereafter, right before you pull down to tighten it at the end, simply take the fingers and pinch the material of the knot in order to create a sort of a “W”-shape. With that set in place, the dimple stays hidden away – all day, every day.
Technique Number 3: The Parisian scarf knot

Scarves can be tricky, we’ll give you that. While they are supposed to help keeping you warm during winter times when you’re carrying out your business outside, you wouldn’t want them ending up being placed around your neck clumsily or pulled too tightly like a snake, squeezing the last breath out of you. All of the scarf-wearing gents out there therefore should learn the Parisian knot, as it is an easy-peasy knot that helps your scarf to be perfectly functional and stylish at the same time. No more tangles, no more loose ends to worry about. You can choose to tie the Parisian knot for a long wool scarf to get the best results. Simply fold the scarf in half lengthwise, hold the looped end with one hand, and the two loose ends with the other. Then wrap the scarf around your neck, threading the loose ends of the scarf through the loop. Lastly, pull them down to secure the know, and Voila, the Parisian knot. Neat, warm and charming.
Technique Number 4: Shine up your shoes
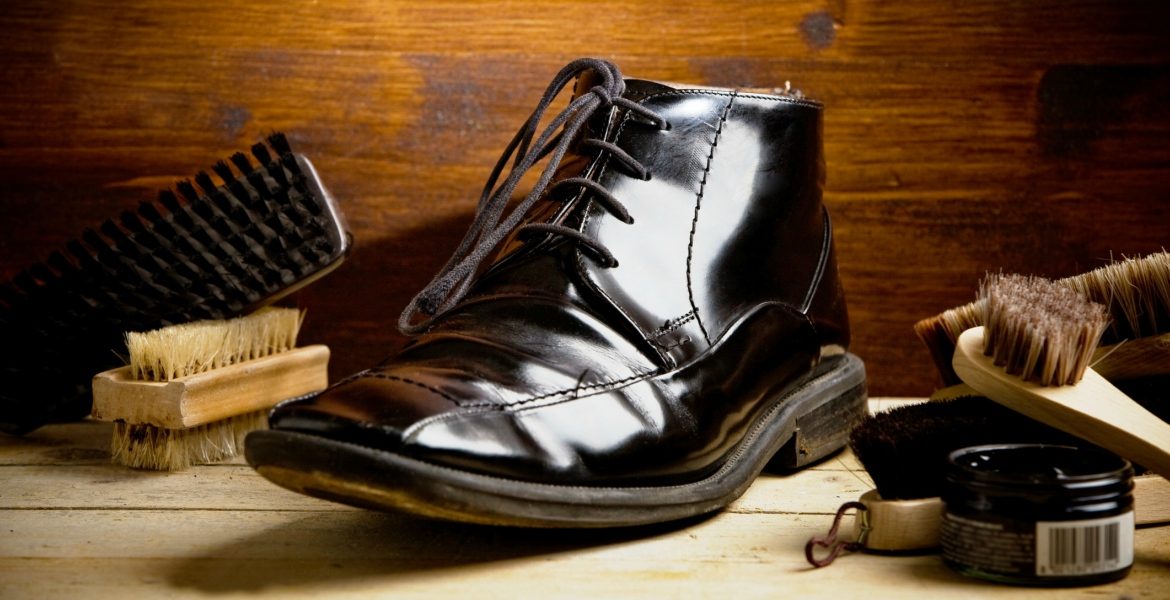
Yes, it seems like a pretty straightforward task to do, yet many get this wrong still. To shine up your shoes, take a brush and gently brush off the dirt of the dress shoes. If you choose to skip this step, you’re risking your shoes to seal the dirt in, and also harmful chemicals will apply onto the leather. Take a good horsehair brush for the best results, clean out the dirt, grime and remove old shoe polish residue. After that, proceed with the polishing (use an old white cloth).
For the best shoe-shining, do small circular strokes. After finishing that process, buff the shoes using the brush once more, and maintain a light pressure while doing so. This allows the new polish to come out looking as consistent as possible.
Technique Number 5: Remember to iron your dress shirt

You probably won’t come across anyone that truly loves ironing shirts, but if you truly care about style, this is a necessary evil. You know it is important, so you better stop procrastinating and get it done. Ironing is all routine that just takes a bit of getting used to. Simply turn on the iron with the appropriate heat setting, pour in distilled water, and get started with the back of the collar. Then the sleeves and then the back (you may need to reposition the shirt a few times for this). To prevent creases, smooth the fabric, spray distilled water to do the tougher ones. The next step are the shoulders before finally turning the shirt over to the front part. Iron the buttons and pockets very carefully. As the very last step, do the front collar and you’re done. To avoid any unpleasant surprises, make sure not to overheat the iron. There are different temperatures for cotton, silk, wools and dress shirts made from synthetic material.
Technique Number 6: Master the sleeve roll technique

The sleeve roll technique is essential. It does the job perfectly and makes sure that the sleeve stays where it is supposed to be. Your arms will still have room to move naturally and even unrolling the sleeve is a very quick thing to get done, when needed to. On top of that, if you happen to own a chambray or flannel shirt, this is the perfect way to crank up your casual style a bit. To get the sleeve roll done right, simply pull the cuff up to your arm. All that’s left after that is to roll back the sleeve so it solely exposes the top end of the cuff. This is all you need in order to keep your modified sleeve style neat and secure.
Technique Number 7: How to keep your dress shirt tucked in

It doesn’t really matter how well a dress shirt fits you, as if it ends up suddenly going untucked, it would do you any good. Even worse is when that happens in front of your colleagues, clients, or far worse, a lovely women that you happen to be talking to. You might just push the dress shirt back into your pants from different sides, but yeah, that will look awkward no matter how smooth you think you’re pulling this off. Okay, you could try to distract her, but chances for that to be a success is pretty slim to non-existing. So, what is the solution to that? Invest in a shirt stay and start getting used to be wearing them. With their strong elastic tension they lock your dress shirt into place the entire time. You’ll even forget that you’re using one, as the day progresses. There are 4 different versions of shirt stays, each doing their job in the same way. Once you have invested in one, untucked dress shirts will become a myth from the past.
Technique Number 8: Learn to fold a suit jacket
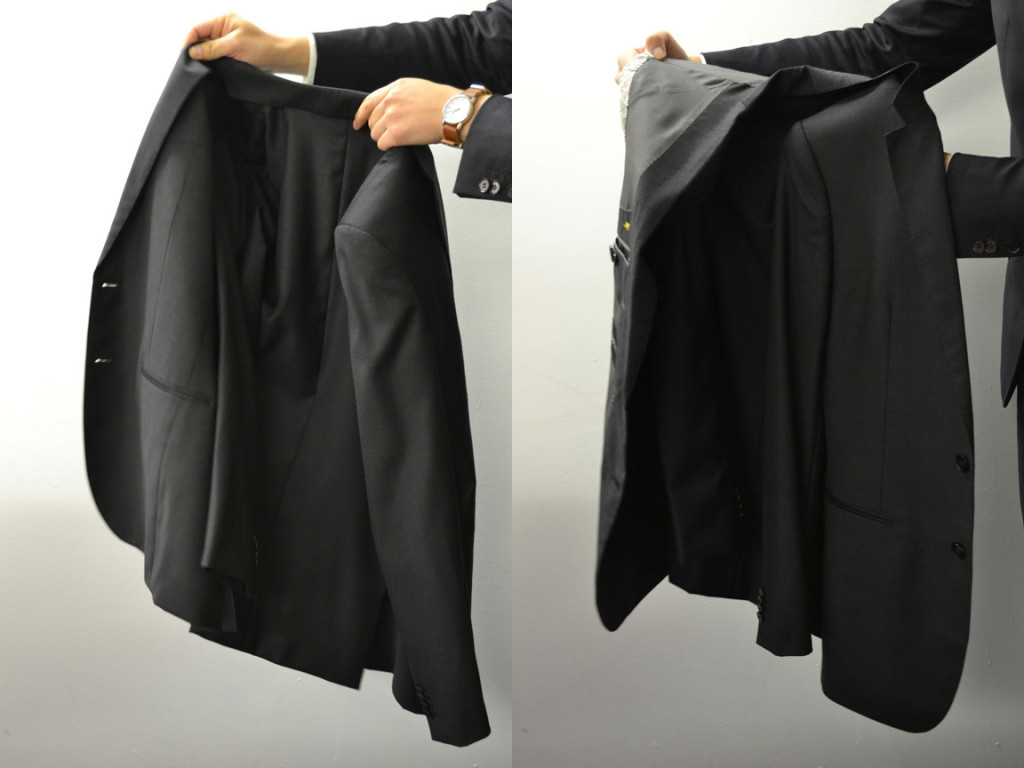
Imagine this. You’re flying out through the door, on the way to a big conference. Big names, the who is who of your company or an event where semi-celebrities are showing up. Either way, you should not let a wrinkled and poorly packed suit ruin what could potentially become a life-changing experience. Here’s a quick tutorial on how to properly fold a suit jacket:
1. Turn one shoulder inside out
2. Put the other shoulder inside the gap
3. Fold the jacket in half lengthwise
4. Load it in your suitcase or travel bag
Technique Number 9: Master the Presidential pocket square fold
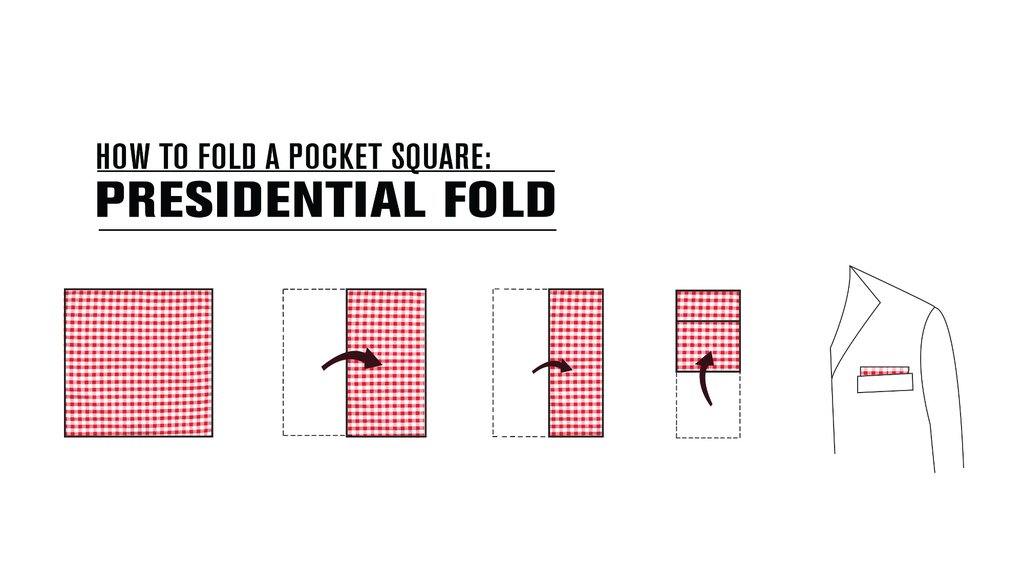
Pocket squares are a small detail, yet a very powerful one. A pocket square often is what makes you stand out in a room full of suits and ties and adds an edge to the look. The pocket square does that. Here’s how to fold the simple, yet stylish Presidential pocket square fold:
1. Keep folding the square in half until it fits in the breast pocket of your jacket
2. Allow only a small part of the pocket square to be sticking out of the top of the pocket
3. If it doesn’t happen to fit in yet, fold the pocket square once more until it does.
Technique Number 10: The two-second T-Shirt fold technique
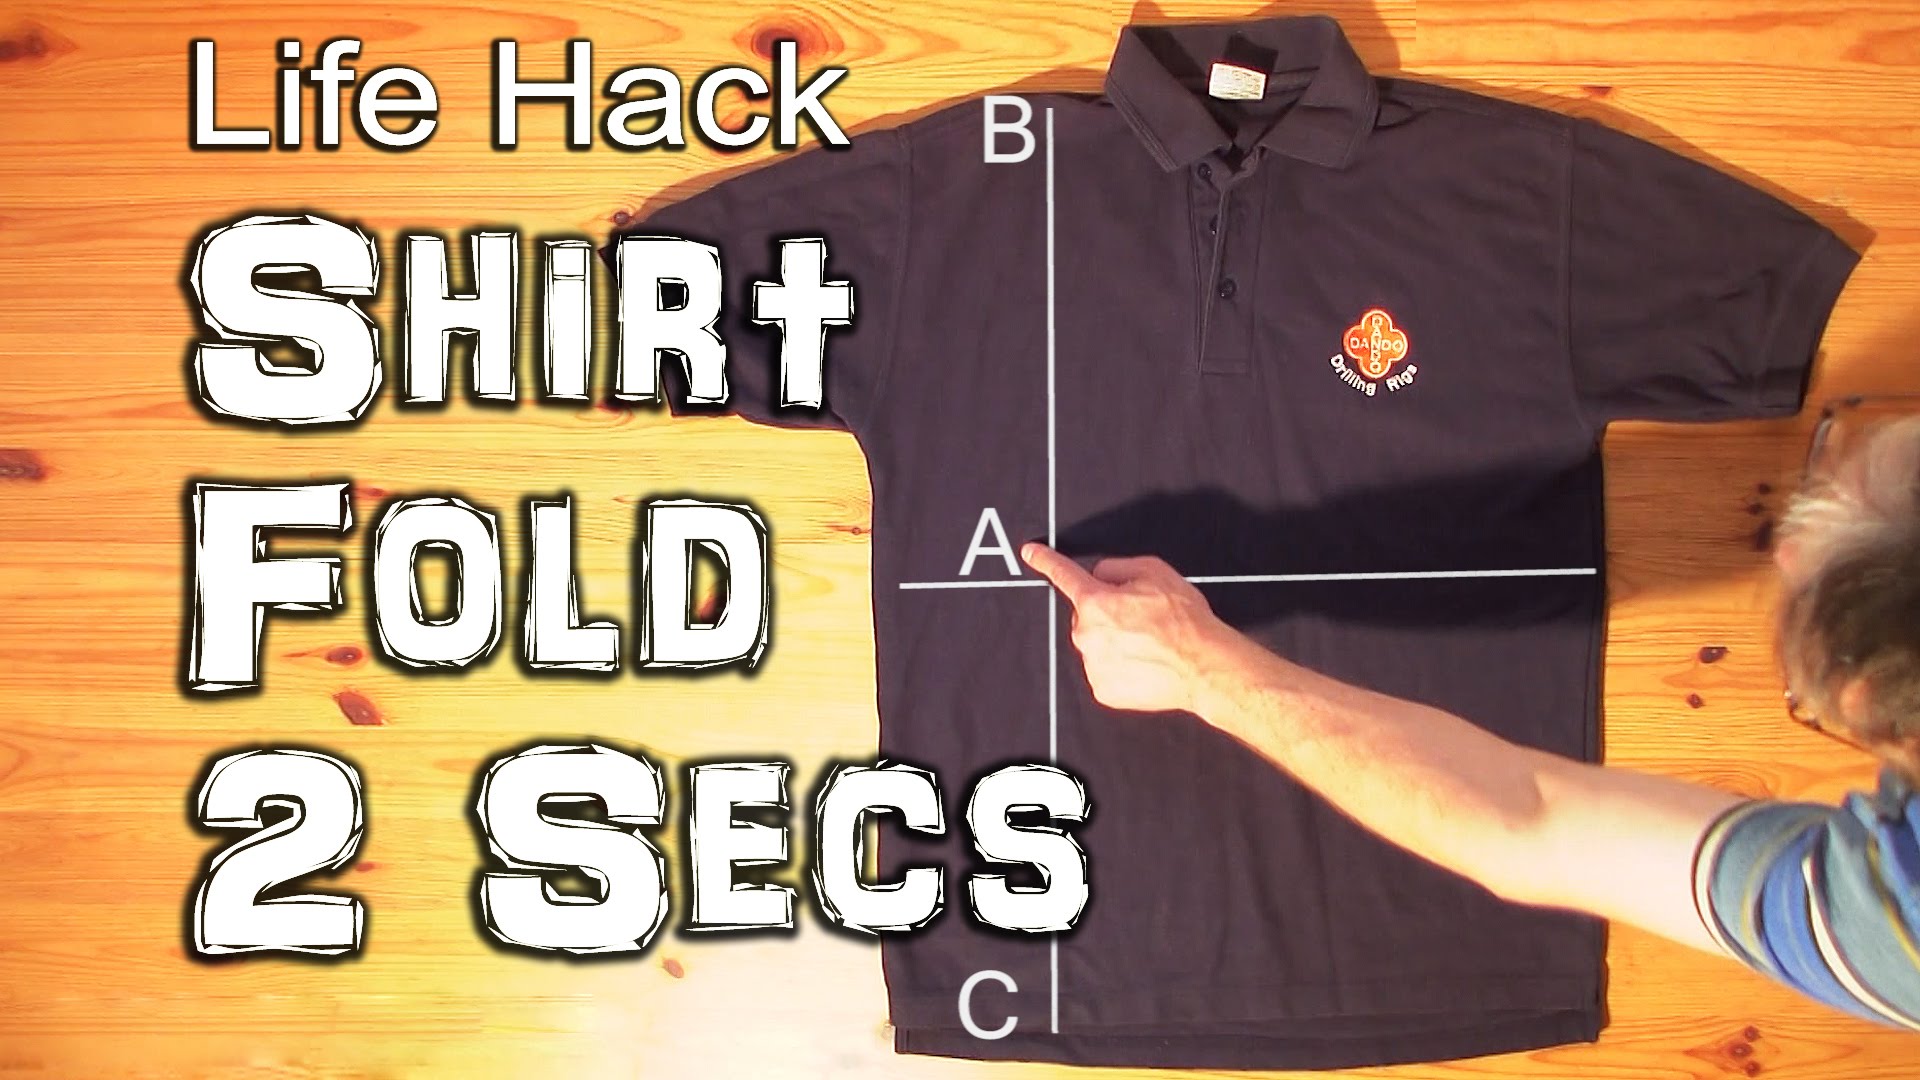
This one we add last, as we admittedly are no big fans of T-Shirts. Yet, we can’t get around this tip, as it actually is a very important one, if you’re wearing T-Shirts on a regular basis, and hey, most gents out there are. Folding T-Shirt won’t be any easier or more time-efficient than with this method, trust us.
First step is to lay out the T-Shirt flat to remove any wrinkles. Next up, visualise two lines:
1. a horizontal line across the middle and
2. a vertical line which cuts between the neck and left sleeve.
The two lines intersect to create a point A, with points B and C being the top and bottom endpoints of the vertical line. Place yourself on the right side of your T-Shirt and pinch point A gently using your left hand. Make sure that you’re grabbing both the front and back layers here.
Next up, pinch point B using your right hand, then bring down point B to point C. Then uncross your arms and lay the T-Shirt with the face (or print) down on the table. Fold in half in order to expose the front, and here you have it – a neatly folded T-Shirt. With a little practice – you’ll become very fast at this practice in no time.
Hands down, you may think now, if all those skills really matter. We say, yes, definitely. Not just solely for bragging rights or being a man, but they also prove that you don’t just care about style on surface level, but a very deep one instead.
If you master how to tie a Half-Windsor, how to put on scarves or pocket squares, how to iron your shirts and fold your jackets, you’re not simply a guy that can dress well. Instead, you are someone who embraces style – and the discipline that comes with it. That kind of discipline benefits both your professional and personal life. So gentlemen, let’s all aim to live in style.